How To Find The Carburetor On Every Lawn Mower
If you have a lawn, then you probably also have a lawn mower, as mowing the lawn is an essential part of its upkeep and maintenance that needs to be done regularly.
And if you own your own lawn mower, with it being a bit of an investment, then you will also have to ensure that you take proper care of it through appropriate maintenance, and this means familiarizing yourself with the different parts of it.
For example, do you know what the carburetor is in your lawn mower? It’s a very important component of your lawn mower’s engine, and without it, your lawn mower will not function as it should.
Depending on the model and design of your lawn mower, there are different types of carburetors, and where they are located. But you need to learn about this so that you can keep the component well looked after.
If you don’t know much about the carburetor, and also don’t know where you can find it within your land mower, then you’re in the right place.
We’re going to tell you exactly how to find the carburetor, regardless of the type of lawn mower that you have, as well as how to take care of it and maintain it, with some extra tips sprinkled in for good measure.
Does that sound good? Then let’s get right into it!
What Is A Lawn Mower Carburetor?
First of all, let’s start by clarifying exactly what the carburetor is, and what it does so that you can understand why it is important as a vital component within your lawn mower.
Put in simple terms, the carburetor is basically a part of your lawn mower’s engine, which is vital in order for it to function properly.
The main purpose of this component is to make sure that there is a balanced combination of fuel and air going into the engine’s cylinder, which in turn ensures that combustion can occur, to set the lawn mower into motion.
So essentially….the carburetor is what allows combustion to occur properly within the lawn mower’s engine, for it to function.
Once the spark plug ignites the mixture of fuel and air within the engine’s cylinder, balanced out by the carburetor, this combusts and pushes the piston of the engine into position, which then causes the crankshaft to rotate, so that the lawn mower’s blades can spin.
Does that make sense? We hope it does!
There are, of course, many different types of lawn mowers. And with some, the wheels will also rotate thanks to this process.
So all in all, the lawn mower carburetor is absolutely essential, as a component that allows for the engine to work.
This is why it is important to familiarize yourself with it and to learn how to maintain it and keep it in top condition so that you can increase the lifespan of the lawn mower as a whole!

How To Find And Identify Your Lawn Mower’s Carburetor
In order to properly maintain and take care of your lawn mower’s carburetor, you first have to be able to find and identify it, so that’s exactly what we’re going to talk about next!
The carburetor is a component that is part of the engine, so as a general rule, you will usually find it either on top of the engine or bolted to one side of it.
It also needs to be connected to the gas tank, and will also usually be either below or behind the air filter. So that’s the kind of area that you need to be looking in.
Most manufacturers actually make it fairly simple, by making the air filter housing accessible and easy to identify, so once you find the air filter, you can find the carburetor, as it will be the next part of the engine that is visible.
That being said, the exact location of the carburetor will vary from manufacturer to manufacturer, depending on the model and design of the lawn mower in question. So you should always check the manual of instructions that comes with your lawn mower!
A few other tips, for finding and identifying the carburetor, are as follows:
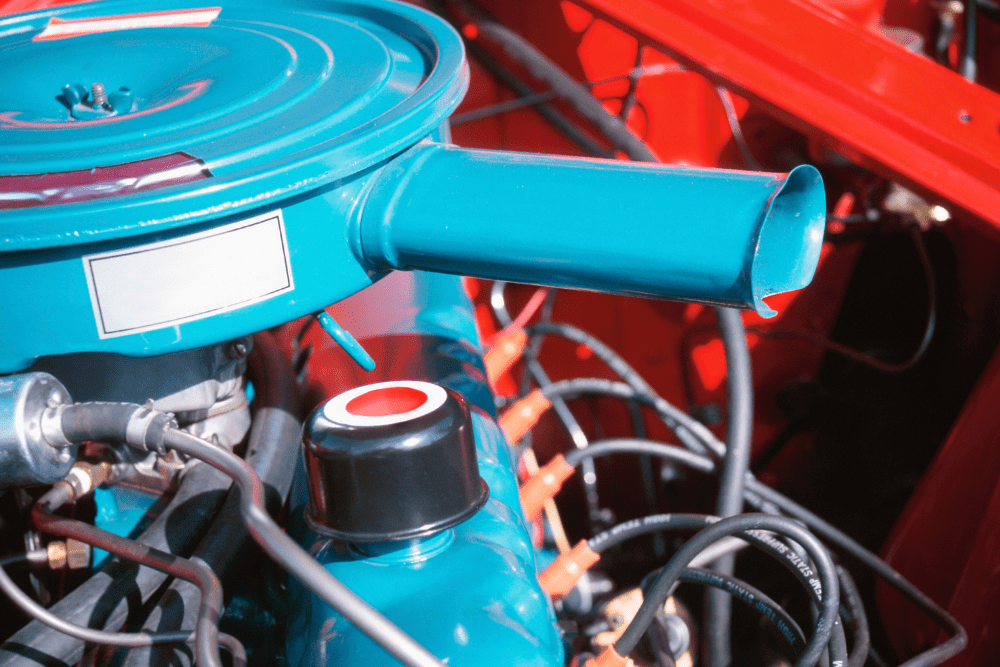
- Carburetors are made out of metal
- Carburetors are rectangular in their shape
- Carburetors often have black areas (for example a black circle and trim, on both ends)
If the manual of instructions and diagram that comes with your lawn mower isn’t quite enough to help you identify and locate the carburate, a good idea is to input the model number into YouTube and search for a tutorial.
Trust us, you are bound to find one that will help you out! You just have to make absolutely sure that you’re looking at the right kind of tutorial, so always double-check the model number that you are inputting!
And don’t worry, because we’re not going to leave you hanging just yet. In order to give you a few more details on the matter, we’re going to be talking about how to find the carburetor in specific types of lawn mowers. So let’s move on to that!
Overview Of The Different Types Of Lawn Mowers
As we have already mentioned, the location of the carburetor can depend on the type of lawn mower in question, as it is not exactly the same in all.
But before we go into more detail on where to find the carburetor, depending on the type of lawn mower you have, we first have to make sure that you are familiar with the basics of the different types of lawn mowers!
Feel free to skip this part if you are already somewhat of an expert, but if not, here is a quick overview of the different types of lawn mowers :
Walk-Behind Lawn Mowers
Walk-behind lawn mowers, much as the name suggests, are lawn mowers that you push and therefore walk behind, when in use.
There are different types within this main category:
Electric Walk Lawn Mower
An electric walk mower is ideal for small properties, as it holds a charge after which it will power down. It is convenient, but will not always be able to stay in use for very long.
Self-Propelled Lawn Mower
Self-propelled mowers can be incredibly convenient, as they propel themselves, meaning that you don’t have to exert as much effort, especially when going uphill. They can have a front-wheel drive (suitable for level ground) or a rear-wheel drive (suitable for sidehill and uphill ground).
Two-Function Lawn Mower
A two-function mower can mulch and bag at the same time, while cutting the grass, making it highly convenient.
Three-Function Lawn Mower
A three-function mower is kind of like a level up from the two-function mower. It cuts the grass, all while bagging, mulching, and side discharging, making it even more convenient and advanced.
Riding Lawn Mowers
Much as the name suggests, riding lawn mowers are the type of lawn mowers that you ride on while operating, the ones that almost look like mini tractors for kids.
There are different types within this main category:
Rear Engine Riding Lawn Mower
This is the smallest type of riding lawn mower that there is, practical and convenient, especially for smaller properties.
Lawn Tractor
Lawn tractors (also referred to as garden tractors) are one of the most powerful types of riding mowers, with a powerful engine. They are ideal for larger properties and can go for ages.
Zero Turn Radius Lawn Mower
Zero turn radius lawn mowers are almost as powerful as lawn tractors, but their design prioritizes maneuverability, making them a lot easier to use.
There are more types of lawn mowers, but these are the main and most common ones. Plus, most lawn mowers will fit into either of these main categories.
Nevertheless, once again, always check the manual of instructions in order to find the exact location of the carburetor!
Location Of The Carburetor In Different Types Of Lawn Mowers
Now that we have given you an overview of the different types of lawn mowers (or at the very least the most common and basic types), it is time to get back to the main matter: the location of the carburetor.
We cannot repeat enough times the importance of checking the manual of instructions, because sometimes specific models of lawn mowers have a unique location or design for their carburetor.
But just so that you have a standard guide and idea of where to look, here is the location of the carburetor in the two different main types of lawn mowers:
Finding The Carburetor In A Walk-Behind Lawn Mower
In walk-behind lawn mowers, the carburetor is most often found located at the side of the mower, right above the base. It will be connected to the air intake and the air filter, so if you find these, you will find the carburetor.
Another tip for finding it is to look for the filter housing, which will be share-shaped or round-shaped, depending on the model.
The air filter case should open up with ease, allowing for very easy access to the filter itself. And just behind the air filter housing, you will find the carburetor.
Quite often, there are around two to three bolts that can be easily loosened to remove this filter housing, for better access to the carburetor.
You can also look up videos of “carburetor in a walk-behind lawn mower” online, as a reference.
Finding The Carburetor In A Riding Lawn Mower
In a riding lawn mower, the carburetor is usually found on the side of the engine, very similar to the walk-behind mower, just behind or below the air filter housing.
It is necessary to remove the filter and air filter housing in order to access the carburetor, but this should be fairly easy, as they are built to be accessed with ease for regular maintenance.
You can also identify the carburetor by following along the fuel line, all the way from the gas tank, as they are connected.
It is worth mentioning that the carburetor in a riding mower is not as easy to find or identify as with a walk-behind mower, making it a bit more complicated to access.
This is why you will usually need a professional to repair or replace the carburetor if you have a riding mower. But of course, this depends on your own level of skill!
You should be able to do it yourself, if you want, so long as you check the manual of instructions, and are confident with what you are doing.
We recommend taking pictures or videos along the way so that you can then put everything back together as it was, once you have finished the repair or replacement.
How To Replace The Carburetor In Your Riding Lawn Mower
Replacing the carburetor in a walk-behind mower is fairly easy, and your manual of instructions should be more than enough to get it done, fast and easy.
A riding lawn mower, on the other hand, is a little more complicated, which is why people often rely on a professional.
But if you prefer the DIY method, and are confident enough to replace the carburetor yourself, then let us guide you through the steps, so that it’s a little easier for you, and you make sure you are doing it right.
First of all, you are going to need to uncover the carburetor, so that you have access to it:
- Start by turning off the ignition switch (very important!). For safety, we also recommend taking out the key entirely.
- Lift the mower’s seat up, in order to access the inside components.
- Find the bolt that connects the battery to the negative cable, and disconnect it. You have to make sure that the cable will not come into contact with the battery, so make sure it’s well tucked away. (Again, this is for safety reasons).
- Lift up the hood of the lawn mower.
- Remove the air duct (you will have to remove the mounting screws for this)
- Identify the air filter cover and remove it (for this you will have to first remove the retaining knobs by rotating them counter-clockwise).
- Take the air filter out, carefully, and then remove the filter housing screw.
- Remove the bolts connecting the front blower housing, and then do the same for the rear housing.
- Entirely remove the blower housing, put it to one side, carefully.
- Remove the lower dash fastener, and then the lower dash.
- Use some hose pinch-off pliers to clamp off the fuel line (make sure you understand how to do this beforehand!)
Once this is done, you will have access to the carburetor. And the next step is to disconnect it, so that it may be removed:
- Start by taking a picture of all the connections for the carburetor, so that you know exactly how things should go when you’re installing the new one. (This is optional, but highly recommended!)
- Disconnect the clamp connecting the fuel line to the carburetor, then pull off the fuel line from the carburetor. (This is likely going to make quite a mess, so make sure to have a cloth on hand for all the drips of fuel!)
- Next, remove the air intake mounting nuts.
- Disconnect the breather tube and then remove the air intake.
- Find the wire from the fuel solenoid and remove it.
- Remove the mounting studs that hold the carburetor in place.
- Take the throttle rod and throttle spring out.
- Disconnect the choke rod.
- Fully disconnect the carburetor.
- Remove the intake gasket on the engine. Then, clean the surface so that everything is clean.
Now that you have removed the carburetor from your mower, it’s time for the last step in this whole replacement process: installing the new carburetor. Here is how to do it:
- Start by getting the new carburetor ready, by having it nearby. Then, the first step is to reconnect the choke rod.
- Re-connect the spring rod and throttle rod.
- Install the new intake gasket onto the engine (check the product manual for this if needed!)
- With the use of the mounting studs, attach the new carburetor to the engine, so that it is in the right place.
- Tighten the mounting studs until the carburetor is secure!
- Connect the fuel solenoid wire (if you took photos while removing the old carburetor, this should be easier to get right).
- Next, connect the breather tube into the air intake, and then attack the air intake to the new carburetor.
- Install all of the air intake mounting nuts.
- Connect the fuel line to the carburetor.
- Remove the hose pinch-off pliers from the fuel line.
- Re-install the lower dash, making sure you use the fastener so that it is properly secured.
- Reposition the blower housing on the engine, aligning the air diverter correctly.
- Put the blower housing mounting bolts in, then put the air filter housing screw in.
- Re-install the air filter, just as it was before.
- Re-attach the air filter cover onto the engine. To tighten the retaining knobs, make sure to implement clockwise turns.
- Re-install the air duct, with all its mounting screws.
- Carefully, reconnect the negative cable to the battery terminal.
- Put the mower seat back down. Check that everything is okay.
- Finally, turn the mower on to check that it’s working properly!
And that’s it! It’s a bit of a long process, and you have to be pretty careful at every step. But if you succeed, you will have replaced the carburetor of your lawn mower, without the need for a professional!
How To Find The Carburetor In Your Specific Lawn Mower
We’ve given you quite a few bits of information on the carburetor, what it is, and where to find it, as well as detailed instructions on how to replace a carburetor on a riding lawn mower, which is usually one of the harder things to do.
But here’s the thing, as we have already mentioned, every single lawn mower can be unique, depending on its type, design, and model. So the exact location of the carburetor can vary, even if only slightly.
And we promised that we would teach you how to find the carburetor regardless of the lawn mower that you have.
So without further ado, here are some standard instructions on how to find the carburetor, on your specific lawn mower, that applies to absolutely everyone.
- First of all, turn off your lawn mower, and put the parking brake on. (You can also put the mower in gear in order to stop it from accidentally rolling away!)
- Release the hood of the mower so that you can access the engine. This will be different depending on your mower, maybe hood latches, or other restraining devices.
- Find the air intake and the filter. The filter housing (which is square-shaped or round-shaped) should be on the side or on the top of the engine. This, in turn, will be attached to the carburetor, with the use of screws or latches.
- Locate the fuel line coming from the gas tank, which connects to the carburetor. The gas tank will usually be mounted somewhere with easy access.
- Find the fuel line from the tank, it should have a small clamp to attack it.
Basically, you access the engine, locate the air filter housing and the gas tank, and will see that the carburetor is the thing attached to both of these.
How To Clean Your Lawn Mower’s Carburetor
IN order to properly maintain your lawn mower, it is necessary to regularly clean its components, and this includes the carburetor. But…how do you clean a carburetor? We’ve got you covered.
First of all, you will have to follow the steps to remove the carburetor from the mower. You can check further up in this article, as we already went through these steps, or you can look it up on your manual of instructions, which should come with the mower you have.
Once you have removed the carburetor, you can follow these instructions, to clean it:
- Use some special carburetor cleaner spray, in order to clean out the dirt from the carburetor ports. Alternatively, you could use some WD-40 spray, as it will also work.
- If the carburetor has a bowl, clean it.
- Check for rust. If there is rust, eliminate it with the help of some sandpaper.
- After cleaning the carburetor, let it dry fully before re-installing into the mower.
Is It Important To Clean Your Lawn Mower’s Carburetor?
Cleaning your carburetor, as you will have noticed by our short list of instructions above, is fairly easy. The only tricky bit is actually removing the carburetor from the mower and then reinstalling it.
Which can be quite a hassle, and also needs to be done carefully and properly.
But…is it even that important to clean your carburetor?
YES. It is.
If you don’t regularly clean and maintain the carburetor, the lawn mower will not function as it should, and you will be massively decreasing its lifespan.
In fact, here are some pretty big signs of when your carburetor is dirty and needs cleaning, that highly affect the performance of the mower:
- The engine is stalling, or not working properly. It could be cutting off every so often, or outright not turning on.
- The mower won’t start up or will do so with difficulty.
- There is black smoke coming from the muffler of the mower.
- The engine sputters and does not work smoothly as it should.
- There is a significant increase in fuel consumption.
As you can see, these are problems that massively affect the performance, and can outright render the mower useless. So keep it well-maintained, and clean the carburetor regularly (depending on how often you use the mower, of course).
What To Do If Your Lawn Mower’s Carburetor Needs Repairs
Carburetors, when well-maintained and regularly cleaned, can last a decent amount of time. However, like everything in life, they have their limits, and will not work forever.
A time will come, in which your mower’s carburetor will fail, and will be in need of repairs.
So what do you do if this is the case?
If you’re handy with these sorts of things, you could attempt to repair the carburetor yourself, by removing it from the mower, taking a look at what is wrong, and finding a suitable solution.
However, when it comes to repairing a carburetor, with it being such an essential part of the mower’s engine, we would highly recommend that you take it to a professional.
It’s not that expensive to repair a carburetor, and you will find plenty of accessible professionals for hire and will give you a better piece of mind to have it done properly.
It could also be that the carburetor is beyond repair, and instead needs a replacement. If this is the case, replacing it yourself should actually be fairly easy!
You just need to make sure that you are buying the right replacement carburetor for your mower.
Final Thoughts
If you didn’t know anything about carburetors before, then you should definitely know quite a bit about them now! (If you’ve read through it all, that is).
To sum it up quickly, the carburetor is an essential component of the lawn mower’s engine, which keeps it working properly. It can be found within the engine, behind the air filter housing, and connected to the gas tank.
The exact location varies from lawn mower to lawn mower, depending on the type and model, but as long as you know how to identify the piece, you should be able to find it with ease.